Data centers. The "cloud." If you haven't yet recognized it for the threat it is, now's the time. In this era, entrusting your sensitive data to third parties is not the safest bargain, and may be downright dangerous, depending on your situation.
I don't know if you've noticed, but data centers are now directly an instrument of an oppressive regime. The grift is quite clear: lock people into cloud services; charge an arm and a leg for them; and keep building data centers to meet "demand." Oh, and since we'll need something to power those data centers, let's enrich energy companies by building nuclear reactors instead of investing in renewable energy and upgrading transmission lines.
Self-hosting the things you used to put on the cloud might be appealing for you. Problem is, you'd like to be able to access your devices from anywhere. The solution is a virtual private network, or VPN. If you work remotely, you almost certainly are familiar with the process of connecting to a VPN to access your organization's network assets. Individuals can set up the same
Wireguard Basics
WireGuard is a secure, encrypted networking protocol intended to be much simpler than traditional VPNs. Its core concept is the association of nodes in an ad-hoc network with asymmetric keys. It's these keys that are used for authentication, keeping access simple to secure and maintain. WireGuard runs on pretty much everything—including mobile devices. That makes is ideal as a way to create a private network for you and your family.
Before we go too far, let's get some Wireguard terms out of the way.
Peer: Any member of a Wireguard network
Endpoint: A Wireguard Peer that receives Wireguard tunnels to join peers to the network. Endpoints can be thought of as "servers."
Subnet Router: A specialized Peer that can provide access to one or more non-Wireguard subnets it is connected to
"Lighthouse" Server: This isn't really a Wireguard term; it's my term for a Wireguard Peer that serves as the Endpoint for every other Peer in the network, because every Peer can connect to it
There are plenty of commercial implementations of Wireguard. Probably the best-known (and best-regarded) is Tailscale. And Tailscale is indeed fantastic! But in the spirit of owning as much of our stack as possible, I'm going to show you how to implement a Wireguard-based network from scratch, without third-party tools.
Well, almost.
By the end of this, you may well understand why people decide to offload this effort to Tailscale. You've been warned.
Network Design
Our design involves a cloud-hosted virtual machine that serves as a "lighthouse" for all our devices to be able connect to each other, from anywhere in the world. This might seem like a compromise in the notion of "no dependencies," but it's an important tradeoff: the use of the cloud server means we don't have to open up any ports on our home router.
Our network topology looks a little like this:
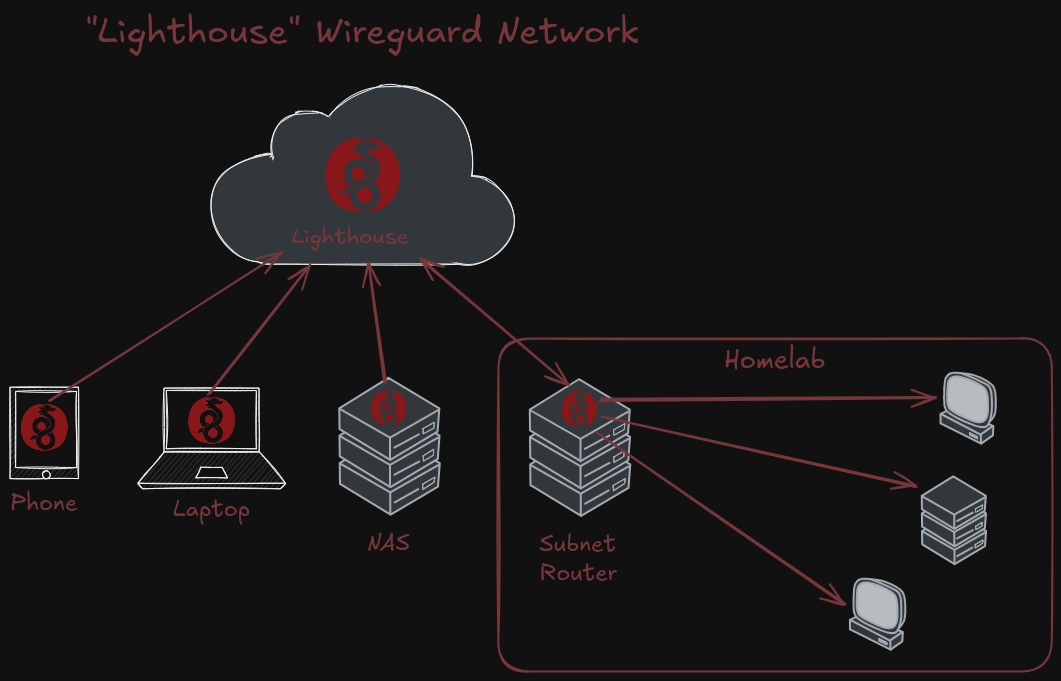
The "Lighthouse" serves as the connection point for all members of our private network. Each Peer will reach out to the Lighthouse as an Endpoint, providing a public key for authentication and authorization. Each Peer, in turn, has a copy of the Lighthouse's public key for mutual trust. The nodes are configured to connect using a given IP address in a predetermined subnet. The lighthouse has a record of each node's public key, and associates that identity with a given IP address it will accept traffic from.
It's worth noting that Tailscale performs some additional tricks so that while a central server is required to initally connect and configure hosts, the traffic actually sent is peer-to-peer, without a central server in the middle, which is what we'll be doing. To use a Lighthouse is to accept that the intermediary server will see the traffic between hosts. This is the tradeoff for not opening your home router to the internet. Consider your threat model. But also remember that even though the Wireguard decryption terminates at the Lighthouse, any interior encryption—such as HTTPS, SSH, or TLS-encrypted RDP traffic—remains secure.
This design is slightly different from a more traditional "Road Warrior" design, which connects directly to a home router and uses Network Address Translation (NAT) to allow Wireguard to cross from the internet into the home network.
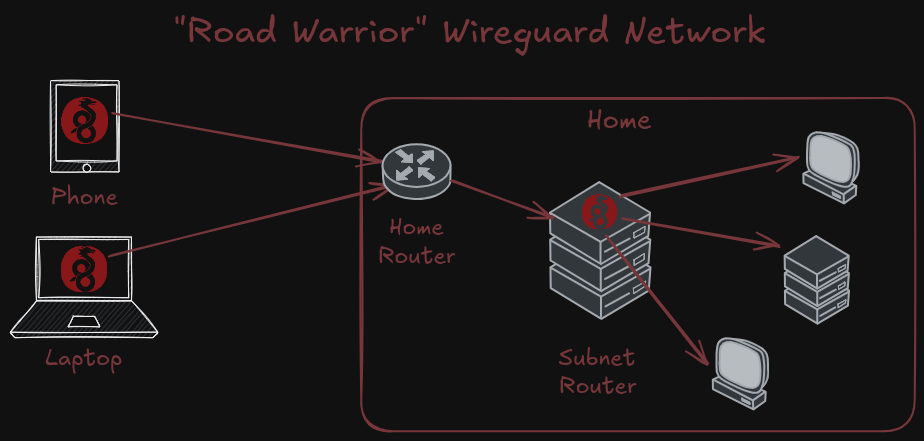
In some road warrior designs, the home router itself can be the subnet router. So why not use this design? You can, if you like. But we are favoring the lighthouse approach to preserve the security and anonymity of our home router. By allowing the lighthouse to be our connection point, we do not have to expose a Wireguard port on our home router.
So the tricky part is generating those keys and configs. But don't worry; this article comes complete with a Bash script to help you out!
There's one additional component that is a little more special in our setup. If you have a homelab, you may want to gain access to the entire lab directly, rather than connecting to a jumpbox in the lab. So while we're setting up Wireguard, we can also set up a virtual machine in our lab as a subnet router to provide direct access to the lab subnet(s) while connected to our Wireguard network. This is completely optional, but handy to have if you use a virtual homelab network for some of the resources you'd want to access remotely.
As far as Wireguard is concerned, the subnet router is just another Peer—except that we'll use nftables to write rules that forward traffic intended for the lab subnet. More on that later.
Let's start setting up our Peers. We'll begin with the Lighthouse itself.
Wireguard Setup
Lighthouse Server
First, you'll need a Linux virtual machine of your choice, on a cloud service provider of your choice. Be sure to set up SSH access, but limit the access to only your home IP. This ensures that your server is safe from opportunistic brute-force attacks against exposed SSH ports.
You'll also want to choose a UDP port for incoming Wireguard connections. The default is 51820, so I recommend choosing something else. 51888 perhaps? It's up to you, but just be aware that using the default port, which has to be open to the internet, will make the server more likely to attract scanners and attacks of opportunity.
Not sure what your home IP is? A visit to https://www.whatismyip.com will sort you out.
With the virtual machine up and running, log in via SSH. You'll want to install Wireguard straight away.
Ubuntu/Debian:
sudo apt update && sudo apt install -y wireguardFedora/Red Hat/Rocky
sudo dnf install -y wireguard-toolsNow we're ready to start building our config files. This is the part that tools like Tailscale handwave away. Personally, I think it is valuable to understand how this works, especially if you rely on it for your privacy and security.
Wireguard uses specially-formatted text files to stand up its interfaces. Each config file has at least an [Interface] section that defines how the Wireguard network interface will be configured on the system. You can also have any number of [Peer] entries that define what Peers you connect to, what Peers can connect to you, and how you handle them.
Let's begin by creating our public and private keys for the server. We'll use those to populate our config file. The wireguard-tools we just installed contain the wg command, which provides the genkey subcommand, which creates a private key, and a pubkey subcommand, which takes the aforementioned private key and produces a public key. We're gonna save both to variables in our shell session.
privkey=$(wg genkey)
pubkey=$(echo $privkey | wg pubkey)
You can echo these if you want to confirm the commands worked.
We need two more values before we can easily write the starting config file: a subnet of choice, and your listening port.
The listening port should already be decided based on the security rules you set up for your cloud VM. That same port is what we'll use, and save to a shell variable.
listenport=51820 # Or whatever you actually chose!The subnet can be any RFC 6890 private address space, but I recommend something like 192.168.100.0/24 to keep it simple. The Lighthouse will take .1 in that subnet, and Peers will take subsequent addresses as needed. Wireguard networks don't really use DHCP; it's all static assignment. That's why tools like Tailscale are so valuable for larger deployments, but we're keeping it simple.
Assign that address to another shell variable.
listenaddress="192.168.100.1/24"Finally, we can generate our starter config file. We'll write it to /etc/wireguard/lighthouse.conf. We'll use a cool Bash trick to do it: here documents.
Make sure to do this as root or use sudo.
cat << EOF | sudo tee /etc/wireguard/lighthouse.conf
[Interface]
# PublicKey = $pubkey
PrivateKey = $privkey
Address = $listenaddress
ListenPort = $listenport
# ==== Peers Below ====
EOF
I love this technique for writing text to a file while honoring shell variables. You can sudo cat /etc/wireguard/lighthouse.conf to confirm the file looks right.
One more thing before we're finished with the Lighthouse server. We need to enable IP forwarding on this machine so that traffic intended for other destinations can make it there.
We do this in two ways: a temporary way for the current boot, and a permanent way that will persist after reboot. To start IPv4 forwarding right away:
sudo sysctl -w net.ipv4.ip_forward=1And to set that permanently:
echo "net.ipv4.ip_forward=1" | sudo tee -a /etc/sysctl.confNow, let's bring up the Wireguard interface, and make sure it comes up automatically on reboots.
sudo systemctl enable --now wg-quick@lighthouseThe Lighthouse is ready to go—for now. We'll need to modify the config to add our Peers, once we have some.
So let's make some.
Computer Setup: Windows/macOS
As much as I'd love for everyone to run Linux, I recognize that's not reality. We'll begin configuring our roaming devices with a Windows or macOS laptop.
Luckily, Wireguard makes installers available for both operating systems. For Windows, there's a direct installer download. For macOS, Wireguard is available in the App Store. Follow the normal installation process there.
Oh hey, you will want to grab the Lighthouse server's public key from its configuration. Make it available to paste into your Wireguard client. Maybe send yourself a Signal message? However you do it, do it securely.
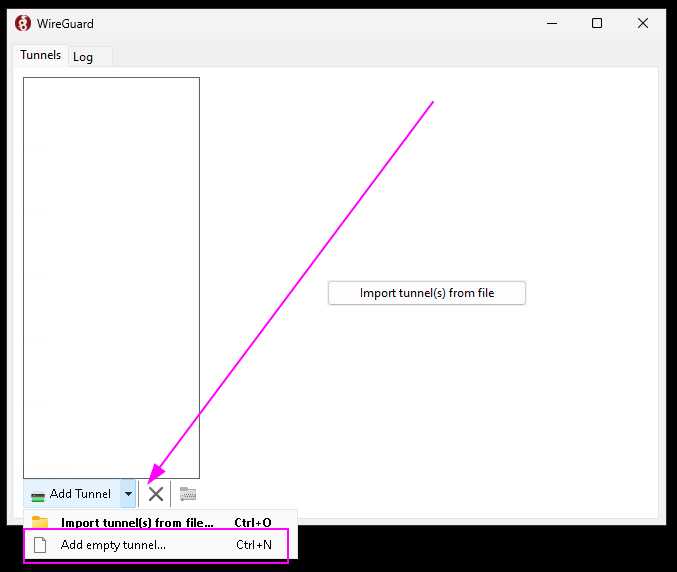
Once the Wireguard app is open, you'll be presented with a giant button to "Import tunnel from file." We don't actually want to do this; we're going to make one from scratch. Instead, click on the tiny dropdown arrow in the bottom left, and select "Add empty tunnel."
Why don't we have a file? Honestly, it's easier to write this thing from scratch than move files around. The empty tunnel starts you off with a public key and a private key. The public key we'll need to move over to the Lighthouse server, just like we need the Lighthouse's here. That's how they know to trust each other! Save the public key so you can paste it to the server before moving on.
The tunnel already has an [Interface] section started with your PrivateKey. Now, give that thing an Address and a name.
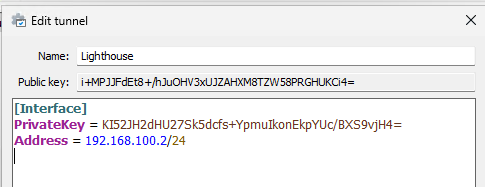
Don't worry, these are throwaway keys; you can't hack me with this information. Note that the Address here is 192.168.100.2/24, the next address in our chosen subnet. Make sure your address matches whatever subnet you used for your server. Don't forget the tunnel name!
Now comes the tricky part. We need to build a [Peer] section underneath the [Interface]. It looks like this:
[Peer]
PublicKey = lighthouse-public-key
AllowedIPs = 192.168.100.0/24
Endpoint = lighthouse-server-ip:lighthouse-listen-port
PersistentKeepalive = 25
A few notes. Make sure you use the proper IP address and port for your Lighthouse, as well as the public key you copied over. Also, note AllowedIPs has a 0 in the last octet. In this context, AllowedIPs refers to the destination IPs you want to reach via the Wireguard tunnel.
Fun fact: setting
AllowedIPsto0.0.0.0/0would turn Wireguard into a "full tunnel" VPN, sending all your traffic out from another node. But that's not what we want.
So all together, your new config should look something like:
[Interface]
PrivateKey = your-private-key
Address = 192.168.100.2/24

[Peer]
PublicKey = lighthouse-public-key
AllowedIPs = 192.168.100.0/24
Endpoint = lighthouse-server-ip:lighthouse-listen-port
PersistentKeepalive = 25
Save that tunnel, but don't bother activating it yet. We need to add this new Peer to the Lighthouse config. Right now, the Lighthouse is up and running, but doesn't know about any Peers. To fix that, we're going to amend the existing config. Back to the Lighthouse server!
Let's use that here document trick again!
cat << EOF | sudo tee -a /etc/wireguard/lighthouse.conf

[Peer]
PublicKey = peer-public-key
AllowedIPs = 192.168.100.2/32

EOF
The
-aoption makesteeappend to the given file instead of overwriting it.
Note that AllowedIPs for this entry uses a different subnet mask— /32 instead of /24. We'll talk about why in a bit.
We've now added our Peer data to the existing config! But if you run sudo wg show, you won't see that Peer as part of the running config. Since we set up the connection up as a systemd service, we can run the following command to restart the connection with the updated config:
sudo systemctl restart wg-quick@lighthouseNow sudo wg show will indicate the Peer, but no active connection. Head back to your computer and finally click Activate on the connection. You should see data flowing!

Congratulations! You've created a Wireguard network! But two Peers really isn't that exciting, is it? Let's add a mobile device to the mix so we can really get cookin'.
Mobile Setup
Both Android and iOS have Wireguard in their respective app stores. Go get it.
There's an option to scan a QR code to import a tunnel config, but since we need to create a new key pair anyhow, let's create a new tunnel from scratch.
Copy the public key and send it someplace you can easily access to add it to the Lighthouse config, just like before.
I really like Signal's "Note to Self" feature for this. If you message yourself, it acts like a scratchpad!
For the Addresses, once again add the next address in your subnet. Write it in CIDR format, like 192.168.100.3/24.
Now it's time to add a Peer. This is of course our Lighthouse server. Add the server's public key. The Endpoint field is in the IP:port format. AllowedIPs will be your whole subnet, like 192.168.100.0/24.
That's it! Save the config, but don't activate it.
Once again, head back to the Lighthouse server. Add a new [Peer] entry with your mobile device's public key, and an Address with a /32 subnet mask. You can do that with a text editor of your choice, or once again use our here doc technique, like so:
cat << EOF | sudo tee -a /etc/wireguard/lighthouse/conf

[Peer]
PublicKey = mobile-public-key
AllowedIPs = mobile-ip/32
EOF
Don't forget that -a for the tee command. If you do, you'll overwrite your entire config!
Restart the wg-quick@lighthouse service as we did before. Now you can activate the tunnel on your mobile device.
Computer Setup: Linux
Desktop Linux is of course a mixed bag of interfaces, network managers, and tools. I can't give you one single graphical method for configuring your Wireguard tunnel. However, if we use the same approach as we did on the server, we can keep the technique pretty much universal.
Once again, install wireguard or wireguard-tools as appropriate for your distribution.
We'll then generate our public key and private keys just as we did above:
privkey=$(wg genkey)
pubkey=$(echo privkey | wg pubkey)
We'll also set up the Lighthouse IP and port as a variable, as well as our new address in the network.
lighthouse_key=lighthouse-public-key
endpoint=lighthouse-ip:lighthouse-port
address=192.168.100.4/24
With that information, we can create a config file the same way we did on the server.
cat << EOF | sudo tee /etc/wireguard/lighthouse.conf
[Interface]
# PublicKey = $pubkey
PrivateKey = $privkey
Address = $address

[Peer]
PublicKey = $lighthouse_key
Endpoint = $endpoint
AllowedIPs = 192.168.100.0/24
PersistentKeepalive = 25
EOF
You know the drill now, right? Get that public key over to the Lighthouse, and let's tee -a up our config changes.
cat << EOF | sudo tee -a /etc/wireguard/lighthouse/conf

[Peer]
PublicKey = linux-public-key
AllowedIPs = linux-ip/32
EOF
Once more restart the service on the server, and then use sudo systemctl enable --now wg-quick@lighthouse on your laptop/desktop to set up the service there and start it. You should now have an active connection to the Lighthouse! Not so bad, right? We didn't even have to open Vim.
Now we come to the trickiest part of the whole setup: the subnet router.
Subnet Router
This section is for folks who want to provide access to multiple devices inside a network at once, such as inside a homelab. It is entirely optional if you don't need it. You can simply add all the Peers you want to access to your network directly with the same techniques we've demonstrated.
But if you choose to continue, know this:
- You will need to slightly adjust every Peer config you've written.
- You will need a dedicated Linux computer in the network(s) you want to connect to.
- You will need to write
nftablesrules.
If you are not dissuaded, onward brave homelabber!
Once again, we'll install wireguard or wireguard-tools as appropriate on this machine. It can be a desktop or server, virtual or not, so long as it is always on—or on when you need access to the devices it will route to.
Now this Peer will connect to the Lighthouse just like all the rest, but it has another trick up its sleeve. In addition to IP forwarding like the Lighthouse, it will use firewall (nftables) rules to pass traffic along to the destination subnet(s) it can access.
To make this easy, self-contained, and reversible, we'll be adding a few extra entries to our Interface section on the subnet router's config.
Okay, more than a few. nftables is kind of a monster.
Let's start with what we know. We'll need a keypair, so let's get that going.
privkey=$(wg genkey)
pubkey=$(echo $privkey | wg pubkey)
We'll also need an address—the next one in our subnet. By my count we're at 5.
address="192.168.100.5/24"Now we need to get fancy. We'll need to make firewall rules for all available network interfaces that you want traffic to flow over.
Use ip a to figure out which interfaces you care about. Keep these in mind as we build out the rules.
Let's start building the config with the easy stuff: our address and keys.
cat << EOF | sudo tee /etc/wireguard/lighthouse.conf
[Interface]
# PublicKey = $pubkey
PrivateKey = $privkey
Address = $address
EOF
Now for the tricky parts. Wireguard configs can include multiple instances of a PostUp directive, allowing commands to be executed prior to initializing the Wireguard interface. We'll use this to enable IP forwarding, as well as set up our nftables rules. There is a matching PostDown directive when you deactivate the tunnel. That means we can make all our system configuration for the subnet router self-contained in the Wireguard config.
I want to walk through this one step at a time so it's clear what each command does.
sysctl -w net.ipv4.ip_forward=1We've seen this one before—we're enabling IP forwarding so packets from other Peers can traverse the router.
nft add table ip filter
nft add table ip nat
Here we prepare nftables by adding two tables that will contain our rules.
nft add chain ip filter forward '{type filter hook forward priority filter; policy accept;}'
nft add rule ip filter forward iifname %i counter accept
These rules accept and forward incoming traffic. This and the sysctl setting work together. Note the iifname %i , which produces this rule for all outbound interfaces.
nft add chain ip nat postrouting '{type nat hook postrouting priority srcnat; policy accept;}'
nft add rule ip nat postrouting oifname "eth0" counter masquerade
Here we create a chain of rules for postrouting—what do we do with traffic once we've decided where it goes? We see the oifname and a specific outbound interface to produce this rule. If you have multiple interfaces that you want to send traffic to (e.g. multiple subnets), you'll need a similar line for each interface.
What does masquerade mean? It means that the outgoing traffic is labeled with the server's own IP address, so that the responses get back to the right destination.
You might be wondering why we're using
nftfor this instead of trusty ol'iptables. The truth is, you totally can useiptablesfor this! But hey: now you're one of like thirteen people who know how to do this withnft. That's neat, right?
These are the PostUp rules. Now, PostDown is much simpler.
sysctl -w net.ipv4.ip_forward=0
nft delete chain ip filter forward
nft delete chain ip nat postrouting
We simply remove all the rules we put in place, so when we bring Wireguard down, the server can resume being a normal machine without subnet router responsibilities.
Putting this all together then, we can construct one big honking here document. Make sure you have the Lighthouse public key and IP/port handy!
(Yes, we're overwriting the work we did before. It's fine; we're demonstrating how it's done .)
cat << EOF | sudo tee /etc/wireguard/lighthouse.conf
[Interface]
# PublicKey = $pubkey
PrivateKey = $privkey
Address = $address
PostUp = sysctl -w net.ipv4.ip_forward=1
PostUp = nft add table ip filter
PostUp = nft add table ip nat
PostUp = nft add chain ip filter forward '{type filter hook forward priority filter; policy accept;}'
PostUp = nft add rule ip filter forward iifname %i counter accept
PostUp = nft add chain ip nat postrouting '{type nat hook postrouting priority srcnat; policy accept;}'
PostUp = nft add rule ip nat postrouting oifname "interface-name" counter masquerade
PostDown = sysctl -w net.ipv4.ip_forward=0
PostDown = nft delete chain ip filter forward
PostDown = nft delete chain ip nat postrouting

# Lighthouse
[Peer]
PublicKey = lighthouse-pubkey
Endpoint = lighthouse-ip:lighthouse-port
AllowedIPs = 192.168.100.0/24
PersistentKeepalive = 25
EOF
Congratulations, you've successfully configured the subnet router!
You can sudo systemctl enable --now wg-quick@lighthouse to bring it up.
Of course, now we go back to the Lighthouse and add the subnet router's information. This one has a twist!
sudo cat << EOF | sudo tee -a /etc/wireguard/lighthouse.conf
# Subnet Router
[Peer]
PublicKey = subnet-router-pubkey
AllowedIPs = subnet-router-address/32, routed-subnet/24

EOF
AllowedIPs is kind of a weird thing. On Peers that connect to others, it serves as kind of a routing rule, saying what subnets to route through the Wireguard tunnel. On Peers that receive connections, like the Lighthouse, it serves as a kind of ACL, indicating what addresses we will accept traffic from. That's why the Lighthouse AllowedIPs needs the whole routed subnet as well as the /32 version of our Wireguard IP for this config. Traffic from the routed subnet will be coming in through this connection, and Wireguard has to know to expect it.
Go ahead and restart the Lighthouse tunnel one more time.
Now comes the kind of annoying part. We need to go back to all of the other configs and change the AllowedIPs section to include the routed subnet(s) the same way. Make sure to use a comma to separate the subnets, and to use the full subnet, like 10.1.99.0/24. Once done, restart the tunnels and you should now be able to access those IPs from any Peer.
Easy Mode
Because I love you and want you to be happy, I've compiled all this Bash into a generator script that wil create Lighthouse, Peer, and Subnet Router configs as desired. It will also generate QR codes, if selected, for all configs.
But I wanted you to learn the hard way first.
Epilogue
That's it. It's over. You did it. You now have a secure private network that you fully control, and that you don't need to rely on anyone to maintain. Even if the Lighthouse needs to move, it's a simple process of moving the config to another server, and pointing all your Peers to the right IP. You could even simplify it by putting the server behind a domain name that doesn't change for the Peers.
Either way, your network is now yours, and you can take it with you wherever you go. I still find a lot of magic in that, whenever I remote into my homelab while I'm traveling.
Raw Wireguard is not the simplest to set up, but once you know how, you have empowered yourself with secure networking forever. I hope you find value in this walkthrough and this design.
Oh and hey—if you liked this and want to build your homelab even more, you might enjoy my book! Food for thought.